Thursday, October 27, 2011

Pumpkin Carving Night


Yeah! It was pumpkin carving night and what a blast we all had with some good wine, great company and some Tim Burton inspiration.

My little niece Lola was such a good helper removing slimy seeds and drawing faces on her tiny pumpkins. I can't wait to do this again next year!


Monday, October 24, 2011

A Wicked Halloween Light Show

Hey, it's Monday but it doesn't mean it has to stink! I hope this video brings you some fun during your lunch break or while the kiddies are napping (my little niece Lola is getting her beauty nap on). I found this video from one of my friend's news feeds on Facebook. Hope you like it as much as Lola and I did. Have a great rest of the day!

Friday, October 14, 2011

Halloween Cupcake Idea: Boiling Cauldron


I have an obsession with cotton candy and no matter how far in a diet I may be, I can't resist a little taste. So while I was shopping for some cupcake decorations, I came across a package of cotton candy specifically for Halloween in the flavor of Sour Apple. Nice. Now the question was what to do with this candy and how could I incorporate that into one of my cupcake ideas?

The only thing I could think of right off the bat was to make boiling cauldrons. So for today's idea, I would recommend you give yourself plenty of time to make these cauldrons. I'm sure there's an easier and more efficient way out there but who wants to make things easy? Right? Right. (I'll regret this later)

Let's make some magic:
  • Pre-made gum paste
  • Black food coloring gel
  • Paintbrush
  • Toothpicks
  • Betty Crocker Icing in a can, Green and Chocolate 
  • Gum paste decorating tool
  • Pre-frosted cupcakes
  • Bag of cotton candy 
  • Non-stick spray, just a little to keep gum paste from sticking
Start by mixing a 1 1/2 inch ball of gum paste with some black food coloring gel. Use a toothpick to dip color. Mix gel and gum paste until it's charcoal grey (that's as dark as it got for me). Roll gum paste into ball. Have decorating tool ready. 


Place ball in the palm of your hand and gently push tool into gum paste. Roll tool in circular motion to create a hallow. Use the palm of your hand to maintain the shape of the sphere.


Place gum paste ball on work surface and continue to widen circular motion until you get your desired cauldron depth and width. Shape gum paste into a cauldron with the tops slightly curved out.


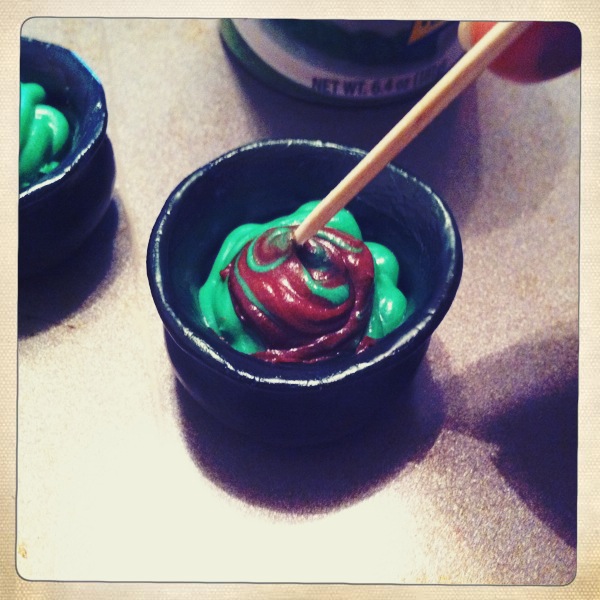
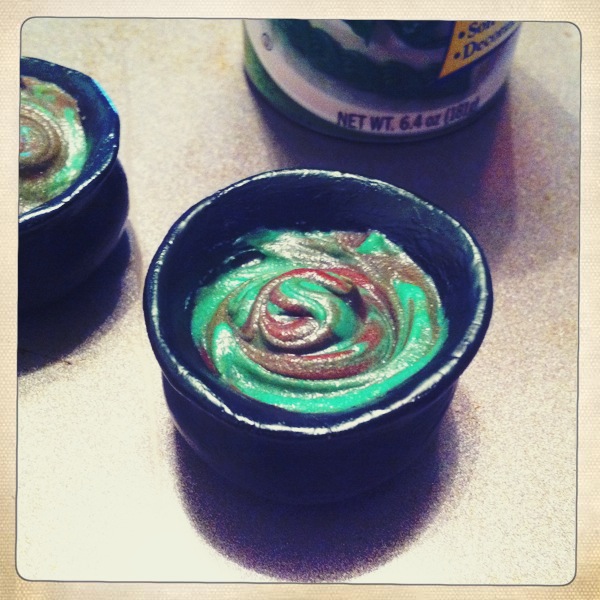
Paint cauldron with Black food coloring gel and let dry overnight. It might not even get completely dry overnight but as long as it's slightly dry you can proceed with the next steps. Next, fill cauldrons with green and chocolate icing. Mix colors with toothpick to create a swirl of both colors.


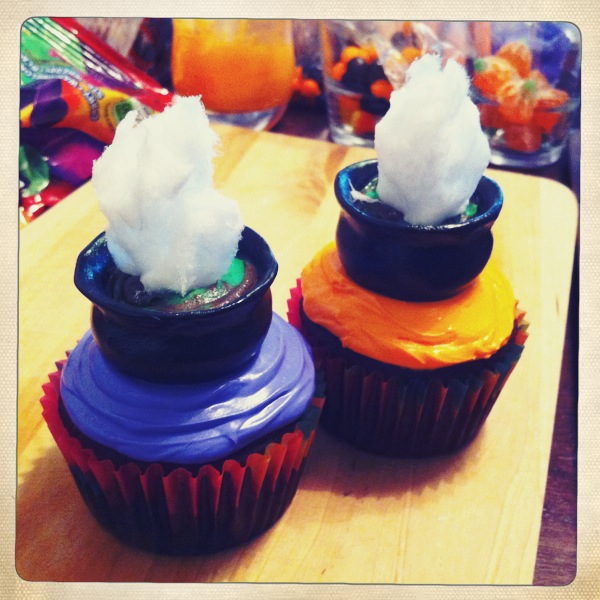
Now you're ready for the easy part. Cotton candy is quite finicky with temperature and you will lose the fluff and pizzazz over time. So I recommend you add the cotton candy when you're ready to serve and display. Take a piece of cotton candy and shape into a small flame. Gently place cotton candy on cauldron brew. Have fun and have a Happy Friday!


Thursday, October 13, 2011

Halloween Cupcake Idea: Eyeball Cupcakes


Oooooooooh! Happy Thursday fellow cupcake lovers. Today's cupcake is yet again, easy and fun to create. It's one of the most perfect crowd-pleasing decor for any Halloween party. Who can ignore a giant eyeball staring you down? You simply must eat it or put it in the corner somewhere.

Let us begin:
  • Frosted cupcakes, white frosting for eyes unless you want go reptilian with yellow
  • Bag of Lifesaver Gummies
  • Red Betty Crocker Cookie Icing (Squeeze bag)
  • Black icing (Squeeze can) or Black flat, round candy


They see hungry people...

Wednesday, October 12, 2011

Halloween Cupcake Idea: Fun with Sixlets


I just recently tried a Sixlet. A little late in the game, I know. For those of you that don't know what a Sixlet is, you can find out via internet search or just know that they are made of chocolate on the inside with a light and crunchy candy coating on the outside. Colors will vary.

I'm so glad I never knew about this candy when I was in fourth grade (my chubby grade) because I would be double fisting Sixlets in one hand and Reese's Pieces in another while trying to beat Super Mario Bros 3 Level 8! Ahhhh fond memories of childhood...*drift drift*

Anyway, you can do a lot with these spheres, Sixlets or generic, and I just wanted to share a couple cupcake ideas that came to mind. Buy them at your local mall candy store and hopefully they have their Halloween/Fall section for you to have fun picking from. Happy Hump Day!

Tuesday, October 11, 2011

Fall/Thanksgiving Cupcake Idea: Pumpkin Patch Cupcakes


This post was inspired by one of my top versatile veggies...the pumpkin. My dad was raised on pumpkin and since I was a child I've had all kinds of pumpkin dishes. But let's not talk savory, let's talk sweet and sour.

Put 'em together and have you got? Bibbidi Bobbidi Boo:
  • Frosted cupcakes, White frosting is what I used.
  • Pumpkin shaped candy
  • Green Betty Crocker Easy Flow Decorating Icing
  • Granulated white sugar
  • Piping skills (In my dreams I'm a world champion cake decorator)
You can purchase the pumpkin candy at a local candy store. I purchased mine at the mall. They had all their seasonal candy on display and ready for the picking. These taste like orange gummies, initially sour and finishes sweet and chewy. 


It takes some practice if you don't usually find yourself piping cakes. I know I had to conduct a couple test runs before I tackled the cupcakes. I used the two tips pictured below, one for the vines and another for the leaves. 


Place pumpkin candy in the middle of frosted cupcake. Pipe leaves and vines around pumpkin. Finally sprinkle sugar over the entire cupcake. Hold cupcake and gently shake off excess sugar. Ta-da!! You have your miniature pumpkin patch ready for the holidays. 

I just have to post this song...I can't resist...

Monday, October 10, 2011

Fall/Thanksgiving Cupcake Idea: Chrysanthemum Flower Cupcakes


Who said flowers couldn't be a part of a Thanksgiving or Harvest party? Instead of falls leaf decorations, try marshmallow chrysanthemums on cupcake. I've posted this instructional video of how to make chrysanthemum cupcakes previously but I'll post it again because she, yoyomax12, explains it so well.

It does take time. So this would be a great treat to make with friends or on a day where other matters are not pressing. I know you can purchase pre-colored sugars or just mix the colors you want by using food coloring. If you decide to mix sugar and food coloring, do not lose hope, keep mixing and mashing because eventually the color will begin to blend into the sugar. I almost thought it was a bad idea but I kept at it and got the colors I wanted: pumpkin orange, brown and teal grey.

Have fun and have a rejuvenating Monday evening!


Another pic for good measure. It's so purrrdy.

Friday, October 7, 2011

Halloween Cupcake Idea: Hairy Twisted Spider


Hehe. He's cute isn't he? How could I forget to make a spider cupcake for Halloween?!

Let's get twisted:
  • Pre-made gum paste
  • Neon green food coloring
  • Black food coloring
  • Black frosting
  • Mini marshmallows
  • Candy buttons
  • Pair of scissors
Frost cupcake and create waves and spikes to make the body look hairy. I really liked this part! Messy frosting.


Next, mix food colorings (neon green and black) into two separate balls of pre-made gum paste. Out of the two balls separate them into six pieces. Roll each pieces into 3 inch tubes.


Twist a pair of neon green and black tubes together and bend them like the picture below. Allow gum paste to harden a bit.


While legs are hardening, grab a pair of scissors and cut mini marshmallow in half to create whites of eyes. Add candy button to the whites and place on frosted cupcake.


Reminds me a creature in Castle Crashers.

With the twisted legs, you want it to be hard enough to support itself but yet soft enough to still bend to adjust. Add legs to cupcake and pat yourself on the back for creating something terrifyingly cute!

Check out some of his other friends that wanted to be included in the post today. Happy Friday!

Thursday, October 6, 2011

Halloween Cupcake Idea: Easy Monster Cupcake


Happy Thursday Everyone! Today's cupcake is super easy and fun to make, especially if you have younger kids. With the cereal I used, you can keep your kids busy separating colors and teaching them the name of the color in the process. Maybe it's just my family but we love spending time teaching our niece words and word association. It definitely shows because she's only 24 months and she KNOWS how to associate conditions and words. For example, when she was almost a year old, her mother told me on an extremely hot day while they were running errands my little niece blurts out, "I...I...I'm sweatin' like a sinner in church." *Hahahahaha* She's too smart for herself sometimes and by the way, she learned that quote from Disney's The Princess and the Frog.

So the moral of the story is: Don't let your kids watch The Princess and Frog at a young age. Jk Jk.

Okay, let's get busy:
  • Cap'n Crunch Oops! All Berries cereal
  • Pre-made gum paste (white and black)
  • Frosting
  • Food coloring
  • Candy buttons
  • Colorful sprinkles (not required) 
  • Non stick spray, just in case the gum paste gets too sticky
In case you're a photographic memory type of person.

Separate the berries by their color and eat one or more just to make sure it tastes good. You know, quality control.


In order to make the half oval eyes. Roll gum paste into a tiny ball, flatten and then roll one end up until you get a half of an oval. Like the picture below. Once you have shaped the whites of eyes, add candy buttons. Ooh, you could also make a cyclops monster!


Finally, use white or respective colors of the berries (green, blue, purple, red) frosting and frost cupcakes. Add on the berries and eyes. Use black gum paste for eye brows or unibrows. Add sprinkles for pizzazz.

Wednesday, October 5, 2011

Halloween Cupcake Idea: Lollipop Ghosts


A Halloween Party isn't complete without a little mischievous fun from cute lollipop ghosts adorned on cupcakes. 

Let's make spooky fun: 
  • Pre-made white gum paste
  • Colorful frosting (green, orange, purple, etc.)
  • Food coloring gel, Black
  • Small point paintbrush
  • Gum paste rolling pin
  • Non stick spray (just a little to keep gum paste from sticking)
  • Confectioners sugar (just like using flour when kneading/working with bread, use confectioners sugar for gum paste)
  • Sprinkles, Nonpareils, Candy, etc.
  • Lollipops (Dum Dum size) like the ones below. Cut off about 3/4 of an inch. 

Prepare cupcakes with colorful frosting and decorate them with sprinkles, nonpareils, candy...whatever and however you desire, just leave enough room for a lollipop ghost. Set aside.

Next, spread a little non stick spray onto work surface and roll out gum paste to about 3 to 3 1/2 inches round.


Drape gum paste over lollipop and shape gum paste. I pinched the sides just to give my little guys some hands. Use paintbrush and black color gel to create faces. Happy, sad, cheeky and groovy.

Place lollipop ghosts on decorated cupcake and Boo Yeah! You have yourself a really cute cupcake that kids and adults will love.

Tuesday, October 4, 2011

Halloween Cupcake Idea: Anisia the Witch


Once upon a time there was a witch named Anisia who owned a needy cat, a crooked hat, a pair of licorice-laced boots, a trusty broomstick, a brewmaster's cauldron and a book of family potions. And that's as far as I've gotten on this story.

It's October and I'm inspired to bake and decorate some really fun cupcakes this month. So here is my first batch of Halloween Cupcake ideas. I was inspired by color or the extremity of them, black and white to be exact. Then I thought of a theme and that's how I came up with the story of my mischievous witch named Anisia. It's always easier when there is a theme/structure to work with.

What you will need:

Pre-made gum paste
Black food coloring gel
Toothpicks
Basic gum paste decorating kit
Small to medium tip paint brushes
Small container of water
Parchment paper for drying models on
Inspiration and Creativity

In order to achieve a pretty decent black model, I mixed toothpick dips of black gel into the gum paste. Mix in black coloring as dark as you can get it. Mold gum paste into desired shape and let harden. Once it's slightly hardened, paint more food coloring gel on the models and let dry on parchment paper. Once dry, place on decorate frosted cupcakes.

Anisia's hat formerly owned by her sister Coriandia.
Licorice-laced boots are the latest craze for young witches.
Given to Anisia from Mama Nola.
A faithful and trusty broomstick...check.
And who can resist her cat who acts like a dog, Zephos?